
Stop asking for privacy.
Start enforcing it.
Stop reacting to threats and start preventing them. ASPIDA provides a powerful, proactive shield against session hijacking and clears away the clutter of cookie banners, giving you back control over your security and your time.
Enterprise-Grade Multi-Tenant Vulnerability Management Security Platform
WHO WE ARE:🛡️ Aspida Security
Strength. Clarity. Protection.Aspida Security is a cybersecurity startup dedicated to building tools that empower SOC Analysts, MSSPs, and Security Engineers to defend against evolving threats.
Our mission is simple: deliver clarity in vulnerability management through modern, accessible, and efficient security platforms.🚀 Flagship Product
___________________________________________________
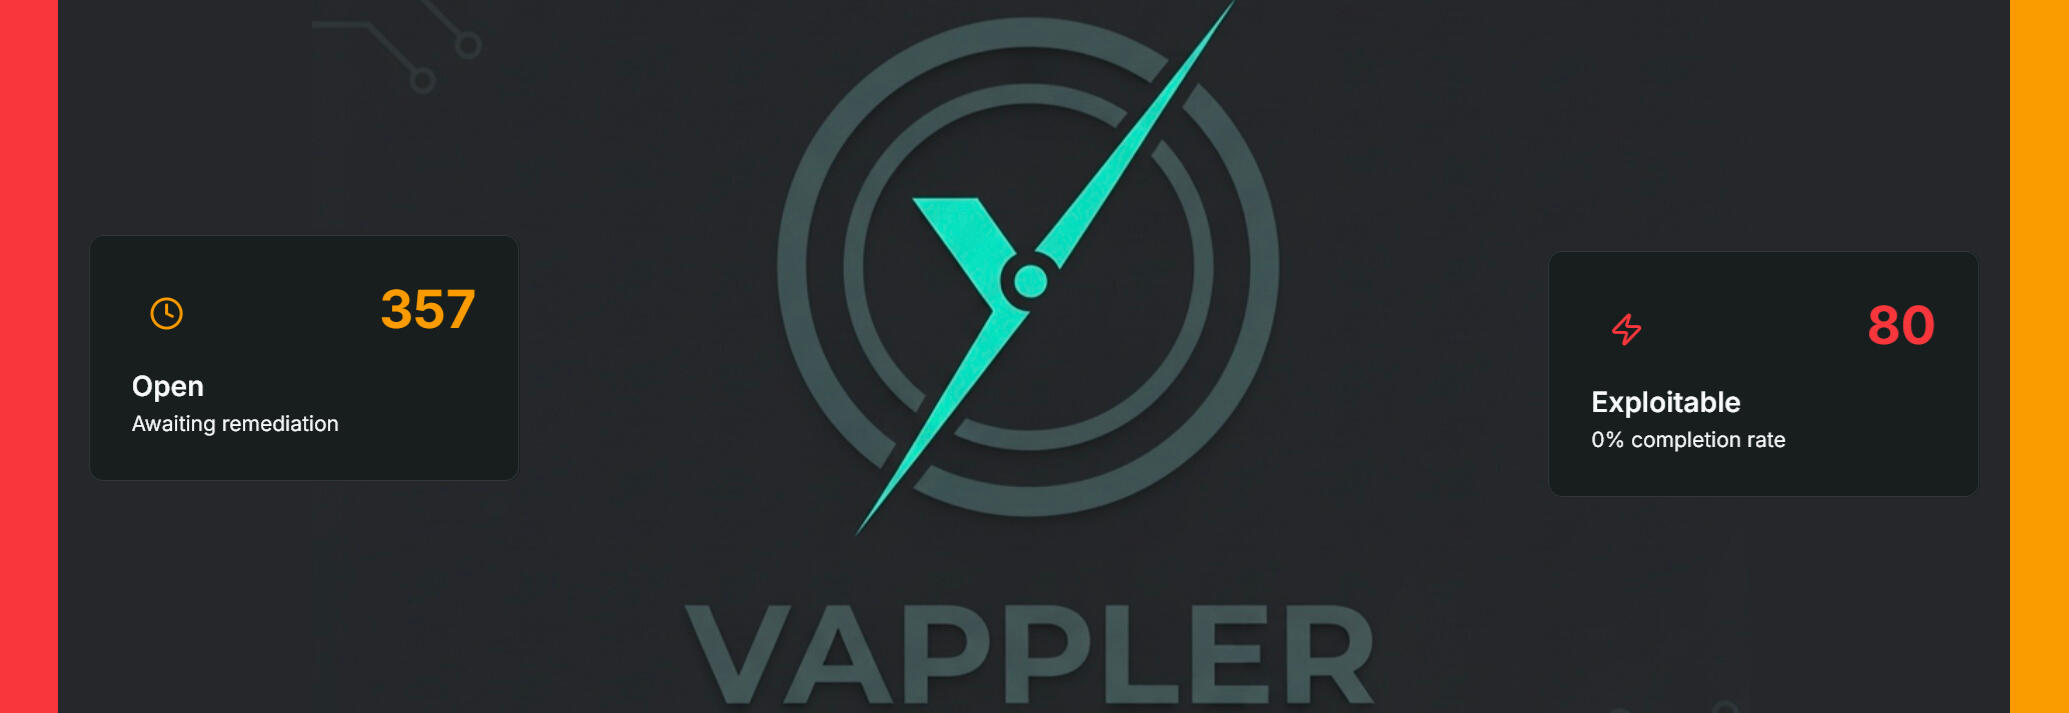
VAPPLER™
_____________________________________________________________________
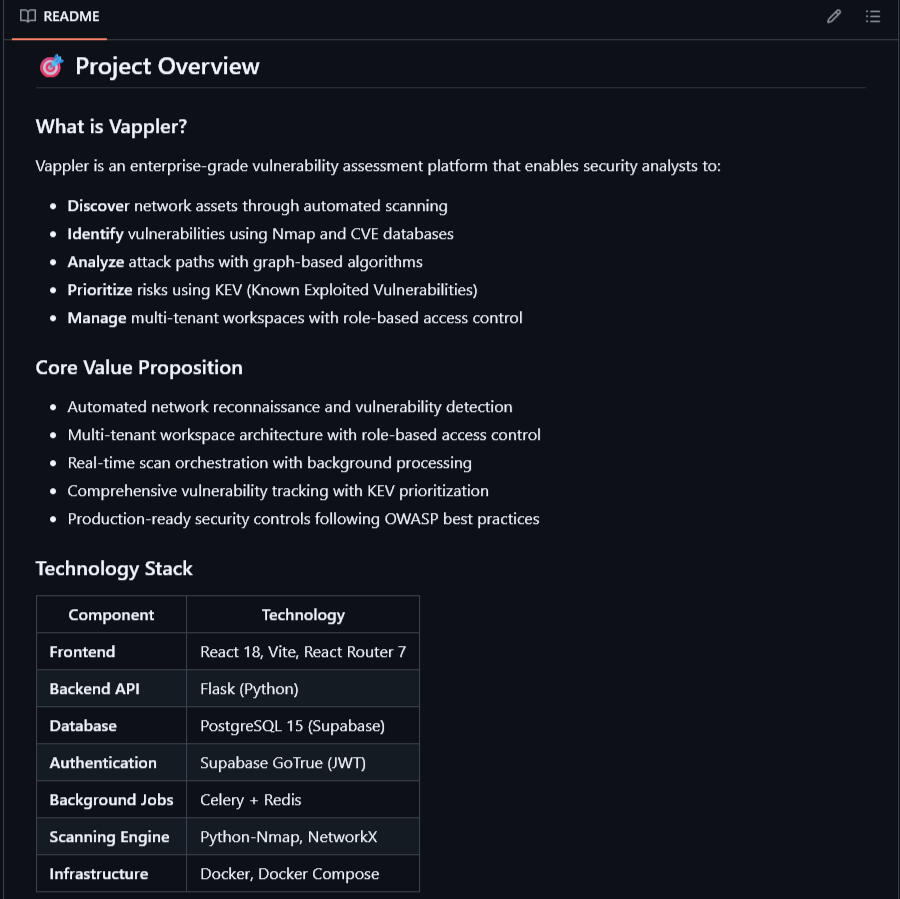
A modern, multi-tenant, attack path analysis & vulnerability management platform designed for SOC workflows.🔍 Vulnerability Dashboards – CVE tracking, severity scoring, and risk trends
🖥️ Client Workspace Manager – Built for MSSPs to manage multiple environments
📊 Asset Inventory & Scan History – Complete visibility into hosts and vulnerabilities
📝 Reporting Tools – Streamlined exports for SOC teams and compliance🧰 What We Build
Security Platforms – SaaS tools that simplify vulnerability management
Analyst‑Focused Workflows – Designed by security professionals, for security professionals
Modern Tech Stack – React, Vite, Redux Toolkit, TailwindCSS, D3.js, Python, Linux, SQL🎯 Our Vision
To become a trusted provider of vulnerability management solutions that balance operational excellence with technical innovation.
We believe in empowering analysts with tools that reduce noise, highlight what matters, and strengthen defenses.

ASK US HOW TO BECOME A BETA TESTER FOR VAPPLER. EARN
LIFETIME - FREE - ACCESS
FOR THE VAPPLER SECURITY AND VULNERABILITY-MANAGEMENT PLATFORM
PLEASE CHECK YOUR E-MAIL FOR FUTURE UPDATES AND NEWS.
THANK YOU FOR VISITING!
TERMS AND CONDITION APPLY. SPACE IS LIMITED. INQURE VIA E-MAIL FOR INSTRUCTIONS ON HOW TO APPLY.
ARTICLE OF THE DAY
The Ultimate PC Optimization Guide for Competitive GamingIntroduction: The Pursuit of Zero LatencyIn competitive gaming, victory is measured in milliseconds.The goal of this guide is to systematically eliminate performance bottlenecks, reduce input lag, and maximize frame rates (FPS) to give you a tangible competitive edge. Our philosophy is simple: your PC's resources are finite, and your game should get the lion's share. We will achieve this by creating a lean, stable, and predictable gaming environment.
________________________________________Phase 1: Isolate Your Gaming EnvironmentThis is the most impactful, yet most involved, step. It's for the truly dedicated player who wants a pristine environment.The "Play Account" Strategy
Concept: You create a second, separate local user account on your Windows 11 PC that is used only for gaming. Your primary account remains untouched for daily work, browsing, and personal use.Pros (The Competitive Edge):• Drastically Fewer Processes: This new account will have none of your daily applications (Discord, Slack, Chrome, cloud storage sync, etc.) running in the background.
• Zero Non-Gaming Startups: The account starts with a clean slate. Only the essential game launchers you install will run.
• Eliminates Interruptions: No notifications or pop-ups from work email or personal apps will ever appear mid-game.
• Reduces Software Conflicts: It creates a "sterile" environment that minimizes the chance of other software interfering with your game or anti-cheat.
Cons (The Inconvenience Factor):
• Requires you to log out and in to switch between your "Work/Daily" and "Play" accounts.
• Game launchers (Steam, etc.) and the games themselves must be installed under the new Play account.
• Initial setup can be time-consuming.How to Create a "Play" Account in Windows 11:1. Go to Settings > Accounts > Other users.2. Click Add account.3. Select "I don't have this person's sign-in information".4. Select "Add a user without a Microsoft account".5. Create a simple username (e.g., "Play" or "Gamer") and a password.6. Once created, log out of your main account and log into the new "Play" account to set it up. Install only your essential game launchers and games here.________________________________________Phase 2: Foundational System CleanupThese steps clean the slate, ensuring no old files or unnecessary programs are holding you back.Application Cleanup ("Debloating")
Go to Settings > Apps > Installed apps and uninstall any software you do not use. Be aggressive.Look for:• Pre-installed bloatware from your PC manufacturer (e.g., "HP Support Assistant," "Dell Digital Delivery").• Redundant applications (e.g., if you only use Firefox, uninstall other browsers).• Old versions of software (e.g., older Java or C++ Redistributables if you've confirmed nothing needs them).Startup Program Management (Crucial)Disabling programs from launching at boot is a huge performance win.1. Press Ctrl + Shift + Esc to open Task Manager.2. Go to the "Startup apps" tab.3. Right-click and Disable everything that is not absolutely essential. Be ruthless. Game launchers, chat programs, updaters, and media services do not need to start with your PC. The only things you might consider leaving enabled are your antivirus and essential audio drivers.• Cause & Effect: Fewer startup apps mean a faster boot time and less idle RAM and CPU usage, leaving more resources available for your game from the moment you start playing.________________________________________Phase 3: Advanced Performance TuningThis is the deep dive where we fine-tune Windows and your drivers for maximum performance.NVIDIA Control Panel for Competitive Play1. Right-click your desktop and open the NVIDIA Control Panel.2. Go to Manage 3D settings.3. Select the Program Settings tab and use the drop-down menu to select your game (e.g., Apex Legends). If it's not in the list, click Add to find its .exe file.4. Apply these exact settings:o Low Latency Mode: Set to Ultra.Cause & Effect: This minimizes the render queue, forcing the GPU and CPU to sync more directly. The result is a significant reduction in input lag—the time between your mouse click and the action appearing on screen.o Power Management Mode: Set to Prefer maximum performance.Cause & Effect: This prevents your GPU from downclocking to save power, even during small lulls in gameplay. This leads to more stable frame times and fewer performance dips.o Texture Filtering - Quality: Set to High performance.Cause & Effect: This makes a very minor, often unnoticeable change to in-game visuals in exchange for a measurable performance boost.o Vertical Sync: Set to Off.Cause & Effect: V-Sync is a major source of input lag. It should always be off for competitive play. If you have a G-SYNC or FreeSync monitor, you will enable that separately here and in your monitor's settings; it does not introduce the same lag.Antivirus Tuning for Gamers (The Stutter Fix)Real-time antivirus scanning is a primary cause of in-game stuttering. We need to tell it to ignore our trusted game files.1. Enable Game Mode: Find the "Profiles" or "Game Mode" feature in your antivirus and ensure it's enabled.2. Set Exclusions (Most Important Step): You must create two exceptions for each game launcher and game.o Folder Exception (for File Scans):Add the entire game installation folder (e.g., C:\Program Files (x86)\Steam) to the Antivirus exclusion list. This stops the AV from scanning game assets as they load from your disk, fixing slow load times and stutter.o Executable Exception (for Behavior Scans):Add the game's main .exe file (e.g., r5apex.exe for Apex) to the "Advanced Threat Defense" or "Behavioral Scanner" exclusion list. This stops the AV from flagging the game's high resource usage as suspicious, preventing performance drops during intense moments.Service Auditing (PowerShell Automation)
Many Windows services run in the background unnecessarily. We can disable them.Manual Method: Open services.msc, find each service below, and change its "Startup type."Automated Method:1. Right-click your Start button and select Terminal (Admin).2. Copy and paste the entire script block below into the Terminal and press Enter.Script to Optimize Services:powershell
# --- Windows Gaming Optimization Script ---
# This script sets non-essential services to "Disabled" or "Manual" to save resources.
# --- Run this entire block as Administrator ---
# Disables SysMain (Superfetch), which is not recommended for SSDs.
Set-Service -Name "SysMain" -StartupType Disabled
# Disables the legacy Internet Connection Sharing service.
Set-Service -Name "SharedAccess" -StartupType Disabled
# Sets the Print Spooler to Manual (starts only when you print).
Set-Service -Name "Spooler" -StartupType Manual
Write-Host "Gaming services have been optimized. A restart is recommended to apply all changes."
© ASPIDA Security. All rights reserved.